Visual Studio Code Advent Calendar 2017 の 11日目の記事です。 🙂
今年の自分は Java と PHP と JavaScript と電子工作の年だったような気がするのですが、そんな中、全てにおいて随分お世話になりました VS Code。Microsoft から Arduino 拡張がリリースされたのが一番驚きました。
ということで、今日より 3日間 VS Code について書いていこうと思います。まず最初は Language Support for Java(TM) by Red Hat(vscode-java) から。「フロントエンド技術を導入した Java ウェブアプリケーション開発」です。
この記事では VS Code で Java とフロントエンド系の開発を行うサンプルプロジェクトを準備しました。 簡単な操作で昨今のフロントエンド技術を使った Java ウェブアプリケーションのビルドができるようになっていますので、興味がある方は手順を追って試していただければと思います。
OS は macOS、Linux、Windows と VS Code がオフシャルサポートする全ての環境で動作することを確認しています。
準備
お使いの環境に次のソフトウェアを導入してください。
- Java (JDK) 8 以上
- VS Code 1.18 以上
JDK については、コマンドライン・ターミナルから java -version コマンドが次のように実行できていれば準備完了です。(Linux の例)
$ java -version
openjdk version "1.8.0_151"
OpenJDK Runtime Environment (build 1.8.0_151-8u151-b12-0ubuntu0.17.10.2-b12)
OpenJDK 64-Bit Server VM (build 25.151-b12, mixed mode)
また、VS Code には次の拡張を導入してください利用します。Language Support for Java(TM) by Red Hat が必須の拡張になります。
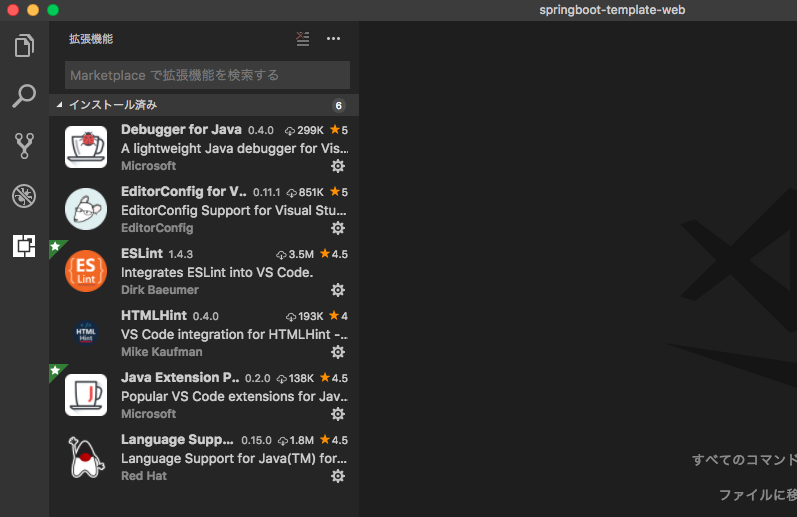
更新:プロジェクト読み込み後に次のダイアログが出力されますので「すべてインストール」を選択すると自動的に導入されます。 また、左サイドバーのプラグインの「推奨」設定に必要なプラグインの一覧も表示されます。

ESLint 及び HTMLHint プラグインについては動作に Node.js の実行環境が必要となりますが、本サンプルプロジェクトのビルドで自動導入されますので別途操作は不要です。
最後に Windows をお使いの方は、VS Code のファイル -> 基本設定 -> 設定より、vscode-java の java.jdt.ls.vmargs プロパティーに対して次の設定をしてください。
{
  "java.jdt.ls.vmargs": "-noverify -Xmx1G -XX:+UseG1GC -XX:+UseStringDeduplication -Dfile.encoding=UTF-8"
}
vscode-java の起動引数の最後に “-Dfile.encoding=UTF-8” を追加します。(更新:プロジェクトのワークスペース設定に事前に設定しましたので操作は不要になりました)
Windows 版の JDK ではデフォルトファイルエンコードが Shift_JIS になっていますが、本サンプルプロジェクトの文字コードは UTF-8 です。この設定により、ソースコード中に直接日本語を書いた場合に vscode-java の自動ビルドで実行するアプリケーションに文字化けが発生するのを防ぎます。
サンプルプロジェクトのダウンロード及び初期ビルド
github から次の操作でサンプルプロジェクトをクローンし、初期ビルドをかけてください。この操作は一度だけで大丈夫です。
git の導入がされていない方は git clone の代わりに .zip ファイルをダウンロード・展開した後、ビルドすれば OK です。
プロジェクトフォルダを配置する場所はどこでも大丈夫ですが、日本語パスを含む場所は避けてください。(後述する Spring Boot 開発者ツールのファイル監視&自動リロード処理が動かないケースがあります)
また、会社や校内などで http/https プロキシー環境下にある場合は、ビルド実行前に次のようなコマンドでプロキシーを設定してください。(環境が固定されている場合は gradlew.bat / gradlew の先頭に書き加えてもOKです)
Windows の場合(cmd.exe もしくは powershell.exe で実行)
set JAVA_OPTS=-DproxyHost=myproxy.co.jp -DproxyPort=8080
set HTTP_PROXY=http://myproxy.co.jp:8080
set HTTPS_PROXY=http://myproxy.co.jp:8080
macOS、Linux の場合(ターミナルで実行)
export JAVA_OPTS=-DproxyHost=myproxy.co.jp -DproxyPort=8080
export HTTP_PROXY=http://myproxy.co.jp:8080
export HTTP_PROXYS=http://myproxy.co.jp:8080
準備ができたらビルドします。(プロキシーを設定した場合は同じ窓で引き続き入力してください) Windows の場合(cmd.exe もしくは powershell.exe で実行)
git clone https://github.com/h1romas4/springboot-template-web.git
cd springboot-template-web
.\gradlew.bat build
.\gradlew.bat eclipse
.\gradlew.bat webpack
code .
macOS、Linux の場合(ターミナルで実行)
git clone https://github.com/h1romas4/springboot-template-web.git
cd springboot-template-web
./gradlew build
./gradlew eclipse
./gradlew webpack
code .
初期ビルドはライブラリのダウンロードを伴うため少し時間がかかります。
サンプルプロジェクトは Gradle を使ってビルドされます。 gradle wapper を使っているため gradle の導入は不要です。 手順では 3つの gradle タスクを実行しており、それぞれ次のような動作を行っています。
./gradlew buiild
サンプルプロジェクトにある build.gradle を元に Java アプリケーションをビルドします。サンプルは Spring Boot を用いたウェブアプリケーションとなっていますが、必要となるライブラリ jar をインターネットから自動的にダウンロードし、アプリケーションが実行可能なように構成します。
./gradlew eclipse
VS Code の記事なのに eclipse と指定されていて不思議な感じですが、実は vscode-java(Language Support for Java(TM) by Red Hat) の実体は Eclipse の JDT と buildship という機能を language-server として外に出し、VS Code から使えるようにしたものです。
このことから vscode-java は Eclipse 用の .project や .classpath ファイル、そして build.gradle を解釈できるようになっています。 この gradle の eclipse タスクは、build.gradle から .project や .classpath を実行環境に合わせて構成するものです。起動した vscode-java はこれらのファイルを参照し、Java の編集・ビルド環境を初期化します。
./gradlew webpack
本サンプルプロジェクトでは以下の Node.js の実行環境を使ったフロントエンドのビルド技術を活用しています。
- webpack (CommonJS/Module)
- babel (ECMAScript 2015)
- ESLint
- HTMLHint
gradle の webpack タスクではこれらのセットアップを gradle-node-plugin を使って行っています。 gradle-node-plugin は Node.js の実行環境を自動的にインターネットからダウンロードし、package.json を参照して必要なモジュールを node_modules にプロジェクトローカルとして格納します。(内部的には、使っている OS の Node.js 実行環境を自動的に選択、ダウンロードし npm install コマンドを発行しています)
アプリケーションの実行
これにて VS Code によるウェブアプリケーション開発の準備完了です。まずはアプリケーションを実行してみましょう。
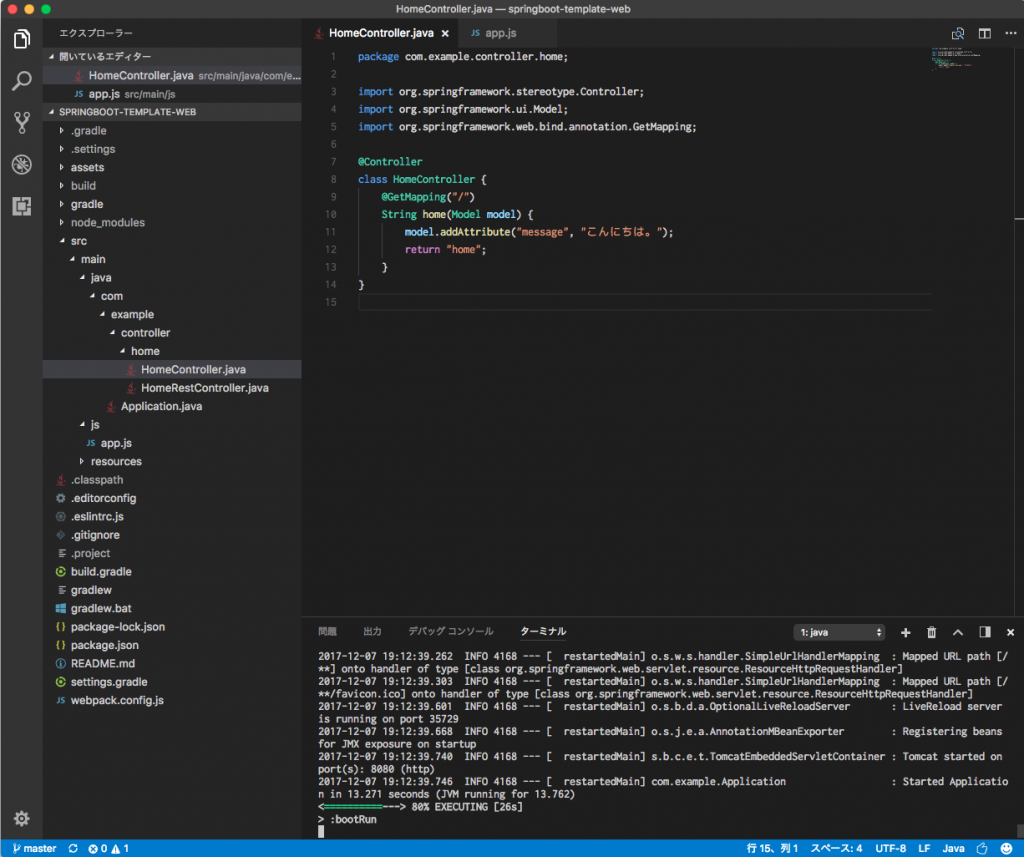
VS Code の統合ターミナルを起動し、次の gradle タスクを実行してください。 Windows の場合
.\gradlew.bat bootRun
macOS、Linux の場合
./gradlew bootRun
ターミナルに “Started Application” と表示されたら準備完了です。
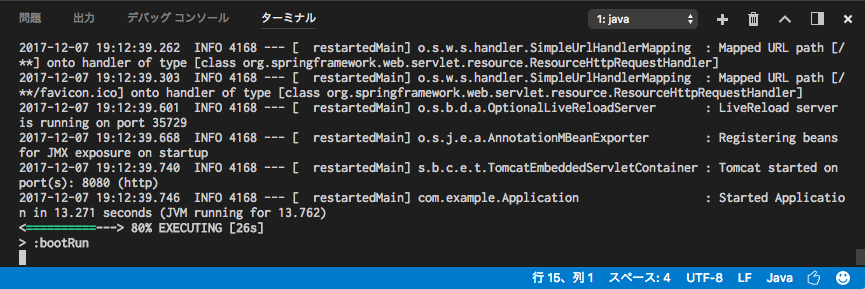
ブラウザから http://127.0.0.1:8080/ にアクセスしてみます。
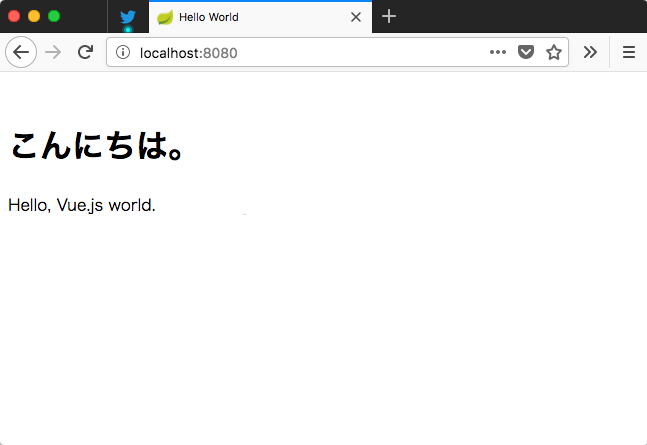
おめでとうございます。 🙂
では、VS Code に戻って src/main/java/HomeController.java を開き「こんにちは。」となっているところを「こんにちは!」などと書き換えてみてください。先ほど統合ターミナルで起動した gradle bootRun タスクが自動的に .java ファイルの編集・ビルドを検知し、アプリケーションにリロードがかかり、ブラウザを更新すると修正した文字列で動作することと思います。
この動作は build.gradle ファイルの次の指定によるものです。
eclipse {
  classpath {
    defaultOutputDir = file('build/classes/java/main')
  }
}
dependencies {
  // ...
  compile("org.springframework.boot:spring-boot-devtools")
}
gradle eclipse タスクで、vscode-java が .java ファイルを保存後に自動ビルド .class ファイルの格納先を gradle bootRun タスクが実行に使う build/classes/java/main に指定しています。
また、spring-boot-devtools を依存に入れることで、bootRun タスク中に build/classes/java/main 内の .class ファイルの書き換えを監視し自動的にアプリケーションのリロードがかかるようになります。(なお、2017/12 時点最新の gradle 4.4 では eclipse タスクに修正がかかっておりこの記述だけでは動作しないため、今回は暫定的に 4.3 を指定して使っています。更新:build.gradle を修正し Gradle 4.9 にアップデートしました)
さらに、このアプリケーションで使われている JavaScript も修正してみましょう。本サンプルプロジェクトは、JavaScript の記述に webpack/babel を用いた CommonJS/Modue、ES2015 が使えるようにセットアップされています。
gradle bootRun タスクが動作中の VS Code の統合ターミナルの右側に配置されている「+」アイコンをクリックし、さらにもう一つ統合ターミナルを起動し、以下のコマンドを実行してください。 Windows の場合
.\gradlew.bat watch
macOS、Linux の場合
./gradlew watch
Module/ES2015 で記述された src/main/js/app.js が監視され、修正を検知しブラウザで動作する形にコンパイルされ、実際に .html から読み込まれる resources/static/js/bundle.js に出力されるようになります。

ためしに app.js を書き換えてみると監視が動作し、bundle.js が書き換わるのが分かります。 開発時の手順は以上です。フローをまとめると次のようになります。
- VS Code でプロジェクトのフォルダを開く。
- 統合ターミナルで gradlew boouRun を実行する。
- JavaScript の開発をする際はもう一つ統合ターミナルを起動して gradlew watch する。
- ソースファイルを編集して開発を進める。
サンプルプロジェクトは Spring Boot のウェブアプリケーションとなっています。ソースコードを修正しながら VS Code の機能とプログラミングを楽しんでみてください。
Language Support for Java(TM) by Red Hat
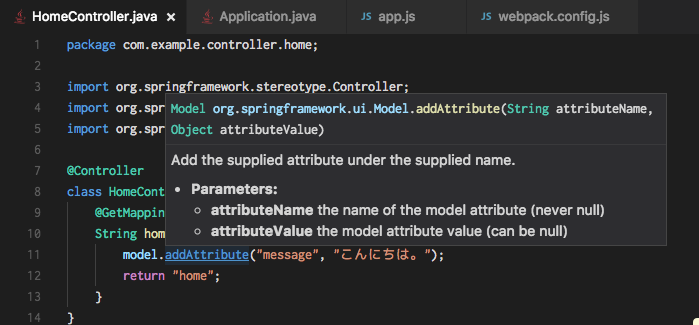
vscode-java では現在、Java 編集時のリアルタイムコンパイルエラー検出、定義ジャンプ、インテリセンス(補完)などの基本的な機能がサポートされています。
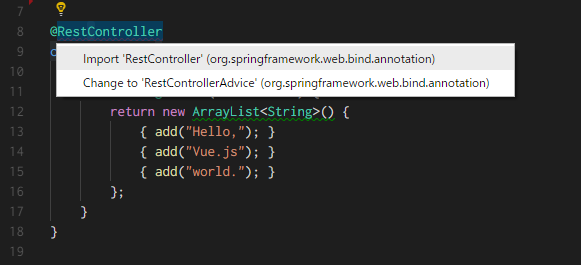
まだクイックフィックスやソースのオートジェネレート系は弱いものの、auto import が実装されましたのでほとんどの場面で困ることはなくなりました。逆にこのほうが Java の勉強になっていいかもです… 😛
import の構成は解決できないパッケージ(赤波線)の上で一度クリックすることで表示される、電球アイコンから行うことができます。
JavaScript
VS Code は標準で JavaScript の編集が非常に強いエディタです。
package.json ファイルを自動で認識して、モジュール構成の JavaScript ファイルであれば適切に IntelliSense することができます。補完は TypeScript 用の型定義を見てくれるようで非常に快適です。
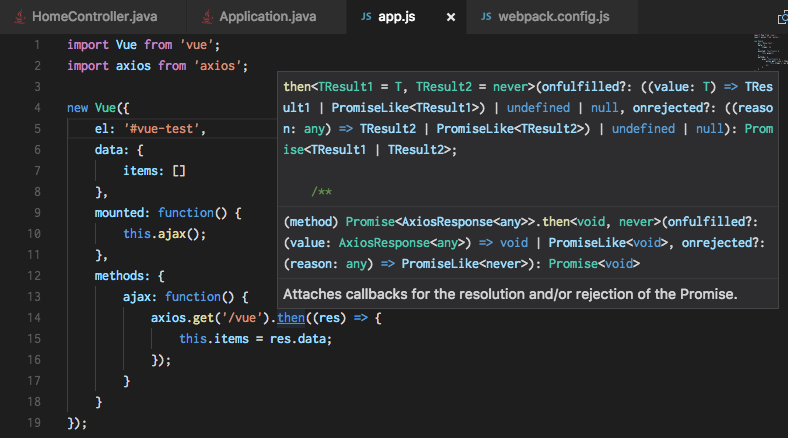
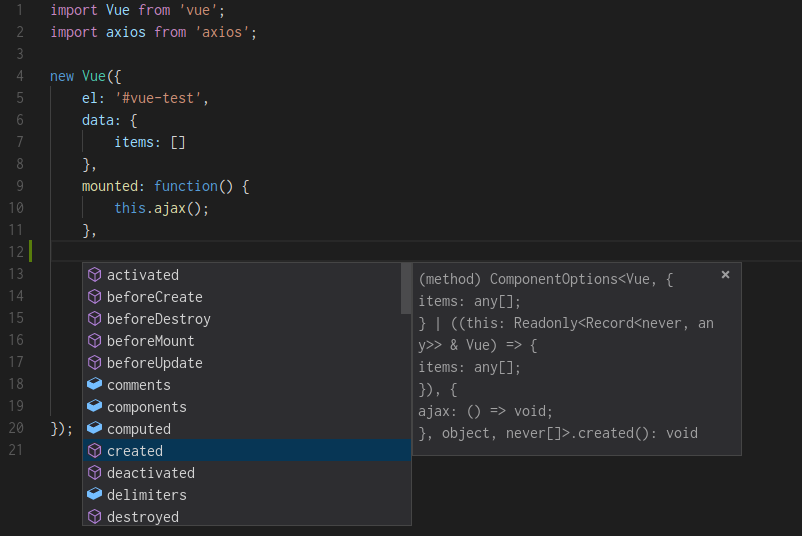
VS Code は Module/ES2015 でソースが書かれていることを認識しますので、例えば Vue.js ライブラリを import した状態で IntelliSense を発動させると次のように Vue がもつプロパティーを表示してくれたりします。(便利!)
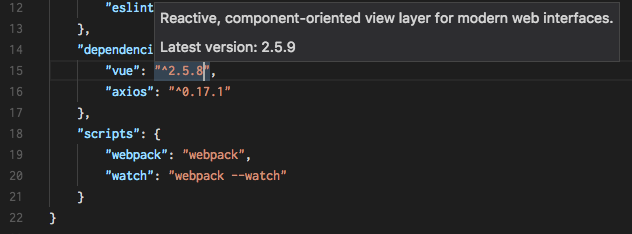
 また、利用するパッケージを定義する package.json の記述では、次のようにパッケージの名称やバージョンを補完することができます。(便利!)
  プロジェクトで利用する JavaScript のライブラリを増やす手順は次のようになります。
- package.json の dependencies に(IntelliSenseをつかいつつ)必要なライブラリとバージョンを指定する。
- gradle watch タスクを実行し、ライブラリを自動的にインターネットからダウンロードさせる。(watch タスクは必要な依存ライブラリ全てを動作するように bundle.js に固めてくれるため .html の .js 読み込み部分に修正の必要はない)
- JavaScript のソースコードで import を構成して、(IntelliSenseで補完しつつ)コーディングする。
非常に快適です。 🙂
ESLint
 サンプルプロジェクトでは package.json の devDependencies に eslint を設定しています。node_modules に eslint があると、VS Code の ESLint 拡張が働くようになり、上のスクリーンショットのように JavaScript の誤りをリアルタイムに検出してくれます。 ソースコードが揃いますので入れておくと便利だと思います。 サンプルプロジェクトでは eslint の設定ファイルである .eslintrc.js を最小限にしていますので、必要に応じてルールを修正してみてください。
HTMLHint

ESLint と同様に node の htmlhint を活用した拡張です。
HTML のタグの閉じ忘れや誤ったマークアップなどをリアルタイムで指摘してくれます。 サンプルプロジェクトでは、テンプレートエンジンに Thymeleaf を使っていますが、このような HTML を壊さない系のテンプレートと非常に相性が良いと思います。
HTML & CSS

VS Code 標準で HTML の emmet 入力及び CSS の IntelliSense に対応しています。 VS Code の emmet は今年に入り 2.0 化され、プレビューができるなど便利になりました。
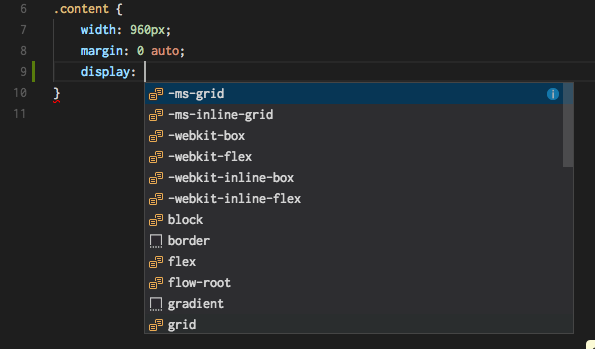
CSS の自動補完も i マークを押すことで対応ブラウザが出力されるなど便利になっています。
EditorConfig for Visual Studio Code
プロジェクトのルートファイルにある .editoerconfig ファイルをみて、ソースコードの文字コードや改行、タブ指定などを揃えてくれます。
root = true

[*]
indent_style = space
indent_size = 4
end_of_line = lf
charset = utf-8
trim_trailing_whitespace = true
insert_final_newline = true
最近はさまざまな OS で開発することが多く、ソースコードの体裁を揃えるために必要な拡張となっています。(今回も 3 OS で検証中、Windows の git の改行コード変換が auto になっていたため、この拡張に助けられました…)
VS Code で Java 開発を始めよう
VS Code による Java 開発は適当にフォルダをつくり、ビルドを入れれば始められるという手軽さが魅力です。
特に、Java はできるが JavaScript は苦手という方にも、JavaScript に対して一般的なプログラミング言語と同等なモジュール構成や補完機能が Java 開発環境内で同時にサポートされますので、楽しくモダンなフロントエンドを学べる良い環境になるのではないかと思います。
お正月休みの研究にいかがでしょうか。


 また、利用するパッケージを定義する package.json の記述では、次のようにパッケージの名称やバージョンを補完することができます。(便利!)
  プロジェクトで利用する JavaScript のライブラリを増やす手順は次のようになります。
 サンプルプロジェクトでは package.json の devDependencies に eslint を設定しています。node_modules に eslint があると、VS Code の ESLint 拡張が働くようになり、上のスクリーンショットのように JavaScript の誤りをリアルタイムに検出してくれます。 ソースコードが揃いますので入れておくと便利だと思います。 サンプルプロジェクトでは eslint の設定ファイルである .eslintrc.js を最小限にしていますので、必要に応じてルールを修正してみてください。


