use cranelift::codegen::ir::{types, AbiParam, Function, InstBuilder, Value};
use cranelift::frontend::{FunctionBuilder, FunctionBuilderContext};
use cranelift_codegen::ir::UserFuncName;
use cranelift_jit::{JITBuilder, JITModule};
use cranelift_module::Module;
use std::collections::VecDeque;
fn main() {
// RPN expression input
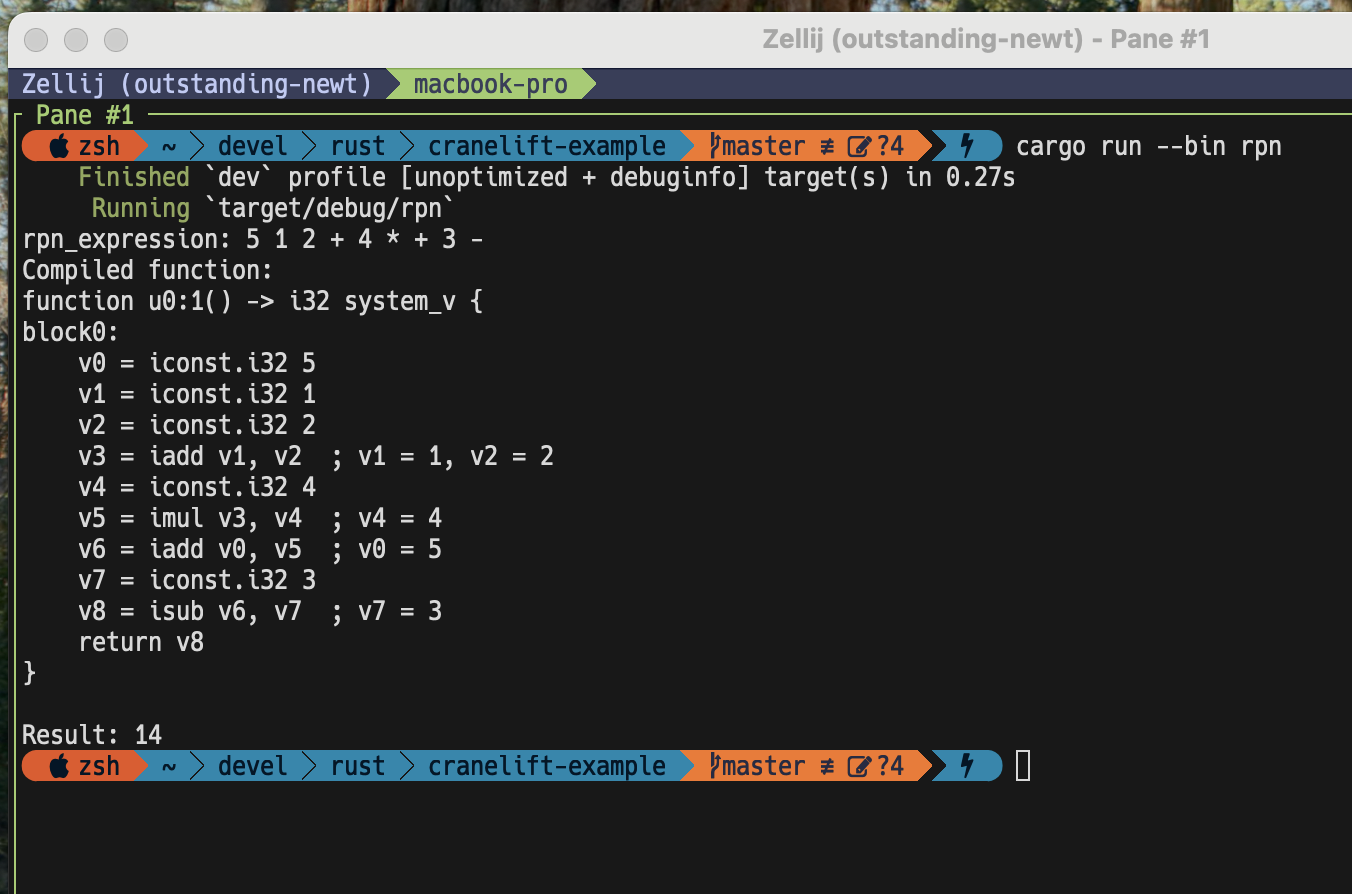
let rpn_expression = "5 1 2 + 4 * + 3 -";
// Create a JIT builder and module.
let jit_builder = JITBuilder::new(cranelift_module::default_libcall_names()).expect("Failed to create JITBuilder");
let mut module = JITModule::new(jit_builder);
// Create the main function signature.
let mut ctx = module.make_context();
let mut sig = module.make_signature();
sig.returns.push(AbiParam::new(types::I32));
let main_func = module.declare_function("main", cranelift_module::Linkage::Export, &sig).unwrap();
ctx.func = Function::with_name_signature(UserFuncName::user(0, 1), sig);
let mut builder_ctx = FunctionBuilderContext::new();
let mut builder = FunctionBuilder::new(&mut ctx.func, &mut builder_ctx);
// Create the entry block.
let entry_block = builder.create_block();
builder.switch_to_block(entry_block);
builder.seal_block(entry_block);
// Stack to hold values
let mut stack: Vec<Value> = Vec::new();
// Parse and evaluate the RPN expression
let tokens: VecDeque<&str> = rpn_expression.split_whitespace().collect();
for token in tokens {
match token {
"+" => {
let b = stack.pop().expect("Stack underflow");
let a = stack.pop().expect("Stack underflow");
let result = builder.ins().iadd(a, b);
stack.push(result);
}
"-" => {
let b = stack.pop().expect("Stack underflow");
let a = stack.pop().expect("Stack underflow");
let result = builder.ins().isub(a, b);
stack.push(result);
}
"*" => {
let b = stack.pop().expect("Stack underflow");
let a = stack.pop().expect("Stack underflow");
let result = builder.ins().imul(a, b);
stack.push(result);
}
"/" => {
let b = stack.pop().expect("Stack underflow");
let a = stack.pop().expect("Stack underflow");
let result = builder.ins().sdiv(a, b);
stack.push(result);
}
_ => {
let value: i32 = token.parse().expect("Invalid token");
let value = builder.ins().iconst(types::I32, value as i64);
stack.push(value);
}
}
}
// The final result should be the only value left on the stack
let result = stack.pop().expect("No result on stack");
builder.ins().return_(&[result]);
// Finalize the function.
builder.finalize();
println!("rpn_expression: {}", rpn_expression);
println!("Compiled function: ");
println!("{}", ctx.func.display());
// Compile and run the function.
module.define_function(main_func, &mut ctx).unwrap();
module.clear_context(&mut ctx);
module.finalize_definitions().expect("Failed to finalize definitions");
let code_ptr = module.get_finalized_function(main_func);
let code_fn = unsafe { std::mem::transmute::<_, fn() -> i32>(code_ptr) };
let result = code_fn();
println!("Result: {}", result); // Expected output: Result: 14
}
use cranelift::codegen::ir::{types, AbiParam, Function, InstBuilder, StackSlot, StackSlotData, StackSlotKind, Value};
use cranelift::frontend::{FunctionBuilder, FunctionBuilderContext};
use cranelift_codegen::ir::UserFuncName;
use cranelift_jit::{JITBuilder, JITModule};
use cranelift_module::Module;
use std::collections::VecDeque;

fn main() {
    // RPN expression input
    let rpn_expression = "5 1 2 + 4 * + 3 -";

    // Create a JIT builder and module.
    let jit_builder = JITBuilder::new(cranelift_module::default_libcall_names()).expect("Failed to create JITBuilder");
    let mut module = JITModule::new(jit_builder);

    // Create the main function signature.
    let mut ctx = module.make_context();
    let mut sig = module.make_signature();
    sig.returns.push(AbiParam::new(types::I32));
    let main_func = module.declare_function("main", cranelift_module::Linkage::Export, &sig).unwrap();

    ctx.func = Function::with_name_signature(UserFuncName::user(0, 1), sig);
    let mut builder_ctx = FunctionBuilderContext::new();
    let mut builder = FunctionBuilder::new(&mut ctx.func, &mut builder_ctx);

    // Create the entry block.
    let entry_block = builder.create_block();
    builder.switch_to_block(entry_block);
    builder.seal_block(entry_block);

    // Stack slot to hold values
    let stack_slot = builder.create_sized_stack_slot(StackSlotData::new(StackSlotKind::ExplicitSlot, 16, 0));
    let mut offset = 0;

    // Parse and evaluate the RPN expression
    let tokens: VecDeque<&str> = rpn_expression.split_whitespace().collect();
    for token in tokens {
        match token {
            "+" => {
                let b = pop(&mut builder, stack_slot, &mut offset);
                let a = pop(&mut builder, stack_slot, &mut offset);
                let result = builder.ins().iadd(a, b);
                push(&mut builder, stack_slot, &mut offset, result);
            }
            "-" => {
                let b = pop(&mut builder, stack_slot, &mut offset);
                let a = pop(&mut builder, stack_slot, &mut offset);
                let result = builder.ins().isub(a, b);
                push(&mut builder, stack_slot, &mut offset, result);
            }
            "*" => {
                let b = pop(&mut builder, stack_slot, &mut offset);
                let a = pop(&mut builder, stack_slot, &mut offset);
                let result = builder.ins().imul(a, b);
                push(&mut builder, stack_slot, &mut offset, result);
            }
            "/" => {
                let b = pop(&mut builder, stack_slot, &mut offset);
                let a = pop(&mut builder, stack_slot, &mut offset);
                let result = builder.ins().sdiv(a, b);
                push(&mut builder, stack_slot, &mut offset, result);
            }
            _ => {
                let value: i32 = token.parse().expect("Invalid token");
                let value = builder.ins().iconst(types::I32, value as i64);
                push(&mut builder, stack_slot, &mut offset, value);
            }
        }
    }

    // The final result should be the only value left on the stack
    let result = pop(&mut builder, stack_slot, &mut offset);
    builder.ins().return_(&[result]);

    // Finalize the function.
    builder.finalize();

    println!("rpn_expression: {}", rpn_expression);
    println!("Compiled function: ");
    println!("{}", ctx.func.display());

    // Compile and run the function.
    module.define_function(main_func, &mut ctx).unwrap();
    module.clear_context(&mut ctx);
    module.finalize_definitions().expect("Failed to finalize definitions");

    let code_ptr = module.get_finalized_function(main_func);
    let code_fn = unsafe { std::mem::transmute::<_, fn() -> i32>(code_ptr) };
    let result = code_fn();

    println!("Result: {}", result); // Expected output: Result: 14
}

// Helper functions for stack operations
fn push(builder: &mut FunctionBuilder, stack_slot: StackSlot, offset: &mut i32, value: Value) {
    builder.ins().stack_store(value, stack_slot, *offset);
    *offset += 4;
}

fn pop(builder: &mut FunctionBuilder, stack_slot: StackSlot, offset: &mut i32) -> Value {
    *offset -= 4;
    builder.ins().stack_load(types::I32, stack_slot, *offset)
}
use cranelift::codegen::ir::{types, AbiParam, Function, InstBuilder};
use cranelift::frontend::{FunctionBuilder, FunctionBuilderContext};
use cranelift_codegen::ir::UserFuncName;
use cranelift_jit::{JITBuilder, JITModule};
use std::ffi::CString;
use cranelift_module::{Module, Linkage};
use libc;

fn main() {
    // Create a JIT builder and module.
    let mut jit_builder = JITBuilder::new(cranelift_module::default_libcall_names()).expect("Failed to create JITBuilder");
    jit_builder.symbol("printf", printf as *const u8);
    let mut module = JITModule::new(jit_builder);

    // Create a function signature for `printf`.
    let mut ctx = module.make_context();
    let mut sig = module.make_signature();
    let pointer_type = module.target_config().pointer_type();
    sig.params.push(AbiParam::new(pointer_type)); // フォーマット文字列の引数
    sig.params.push(AbiParam::new(pointer_type)); // 可変引数のためのダミー引数
    sig.returns.push(AbiParam::new(types::I32));
    let printf = module.declare_function("printf", Linkage::Import, &sig).unwrap();

    // Create the main function signature.
    let mut sig = module.make_signature();
    sig.returns.push(AbiParam::new(types::I32));
    let main_func = module.declare_function("main", Linkage::Export, &sig).unwrap();

    ctx.func = Function::with_name_signature(UserFuncName::user(0, 1), sig);
    let mut builder_ctx = FunctionBuilderContext::new();
    let mut builder = FunctionBuilder::new(&mut ctx.func, &mut builder_ctx);

    // Create the entry block.
    let entry_block = builder.create_block();
    builder.append_block_params_for_function_params(entry_block);
    builder.switch_to_block(entry_block);
    builder.seal_block(entry_block);

    // Create the string data.
    let hello_world = CString::new("Hello, World!\n").unwrap();
    let hello_world_ptr = hello_world.as_ptr() as i64;

    // Call the `printf` function.
    let printf_func = module.declare_func_in_func(printf, builder.func);
    let format_str = builder.ins().iconst(types::I64, hello_world_ptr);
    let zero = builder.ins().iconst(types::I64, 0);
    let call = builder.ins().call(printf_func, &[format_str, zero]);

    // Return the result of the call.
    let result = builder.inst_results(call)[0];
    builder.ins().return_(&[result]);

    builder.finalize();
    println!("{}", ctx.func.display());

    // Compile and run the function.
    module.define_function(main_func, &mut ctx).unwrap();
    module.clear_context(&mut ctx);
    module.finalize_definitions().expect("Failed to finalize definitions");

    let code_ptr = module.get_finalized_function(main_func);
    let code_fn = unsafe { std::mem::transmute::<_, fn() -> i32>(code_ptr) };
    code_fn();
}

// Dummy printf function to link with.
extern "C" fn printf(fmt: *const i8, _dummy: i64) -> i32 {
    unsafe {
        libc::printf(fmt)
    }
}