G* Advent Calendar 2015 9日目です!
昨日は saba1024 さん「[Groovy] MongoDBを簡単に扱えるイケてる言語Groovy -Groovyの応用編-」でした!
職場などで業務改善的なツールをつくりたくなる場合がありますが、案外みんなの PC にスクリプト言語を動かす環境がなかったりします。そんな時は Groovy ! Java の現場であればそのままつくった jar を渡せますし、そうでなくても launch4j などで JRE ごと渡すことができます。
今回は「Groovy + Spring Boot + SWT」という組み合わせで、手軽に高速に GUI Groovy アプリケーションをつくる骨格を紹介してみたいと思います。
珍しい組み合わせかと思いますが、Spring Boot のオートコンフィグレーションと、後述する spring-loaded によるホットデプロイ(GUI 再起動無しで処理を変更できる)と Groovy によるプログラミングの組み合わせは、かなり高速に開発を進めることができると思います。
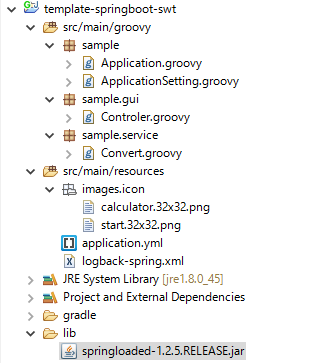
プロジェクトの構成は以下のような感じになります。
まずは、build.gradle で Spring Boot と SWT を定義してあげます。
build.gradle
buildscript {
    repositories {
        mavenCentral()
    }
    dependencies {
        classpath 'org.springframework.boot:spring-boot-gradle-plugin:1.3.0.RELEASE'
    }
}

apply plugin: 'groovy'
apply plugin: 'spring-boot'

repositories {
    mavenCentral()
    maven { url 'http://maven-eclipse.github.io/maven' }
}

dependencies {
    compile 'org.codehaus.groovy:groovy-all:2.4.5'
    compile 'org.springframework.boot:spring-boot-starter'
    compile "org.eclipse.swt:org.eclipse.swt.win32.win32.x86:4.5.1"
}

springBoot {
    mainClass = 'sample.Application'
}
SWT は Windows x86 のものを選択していますが、他の環境の定義は次の通りです。
    // The Standard Widget Toolkit(SWT)
    // System.getProperty('os.name').toLowerCase().split()[0]
    // System.getProperty("os.arch")
    //
    // Windows x86
    // compile "org.eclipse.swt:org.eclipse.swt.win32.win32.x86:4.5.1"
    // Windows x64
    // compile 'org.eclipse.swt:org.eclipse.swt.win32.win32.x86_64:4.5.1'
    // Linux GTK+ x86
    // compile 'org.eclipse.swt:org.eclipse.swt.gtk.linux.x86:4.5.1'
    // Linux GTK+ x64
    // compile 'org.eclipse.swt:org.eclipse.swt.gtk.linux.x86_64:4.5.1'
    // OS X Cocoa x64
    // compile 'org.eclipse.swt:org.eclipse.swt.cocoa.macosx.x86_64:4.5.1'
次に Spring Boot の規約に従って(必要なら)ロガー(logback-spring.xml)と Application.yml を定義します。
src/main/resources/logback-spring.xml
<?xml version="1.0" encoding="UTF-8"?>
<configuration>
<include resource="org/springframework/boot/logging/logback/base.xml"/>
<logger name="sample" level="DEBUG"/>
</configuration>
src/main/resources/Application.yml
setting:
    defaultPath: C:\Users
Application.yml は Spring Boot の設定も記述できますが、作成するアプリケーションで外だししたい設定なども書けます。これを読むための、ApplicationSetting は次のようになります。
src/main/groovy/ApplicationSetting.groovy
package sample;

import org.springframework.boot.context.properties.ConfigurationProperties
import org.springframework.stereotype.Component

@Component
@ConfigurationProperties(prefix = "setting")
public class ApplicationSetting {
    String defaultPath
}
Java でかくと Setter/Getter が必要ですが、Groovy ならこれだけです。.yml のキーと変数名を合わせれば勝手に Spring Boot がバインドしてくれます。
プログラムの起動点となる Application は次のようになります。
src/main/groovy/Application.groovy
package sample

import org.springframework.beans.factory.annotation.Autowired
import org.springframework.boot.autoconfigure.SpringBootApplication
import org.springframework.boot.SpringApplication
import sample.gui.Controller

@SpringBootApplication
class Application {

    @Autowired
    Controller controller

    static void main(args) {
        SpringApplication.run(Application.class, args).withCloseable {
            it.getBean(Application.class).controller.start()
        }
    }
}
通常の Java アプリケーションと同様に main を起動してあげると、Spring Boot が main があるパッケージ配下のコンポーネントを自動でスキャンしてクラスロードしてくれます。 @Autowired で GUI の Controller をインジェクションして main から呼び出しました。
呼び出される gui.Controller は次のようなものです。
src/main/groovy/gui/Controller.groovy
package sample.gui

import org.slf4j.*
import org.eclipse.swt.*
import org.eclipse.swt.events.SelectionListener
import org.eclipse.swt.graphics.*
import org.eclipse.swt.layout.*
import org.eclipse.swt.widgets.*
import org.springframework.beans.factory.annotation.Autowired
import org.springframework.stereotype.Component
import sample.ApplicationSetting
import sample.service.Convert

@Component
class Controller {

    static final logger = LoggerFactory.getLogger(Controller.class);

    @Autowired
    Convert convert

    @Autowired
    ApplicationSetting setting

    Display display
    Shell shell
    ToolItem open
    Table list

    def private init() {
        // Window Setting
        display = new Display()
        shell = new Shell(
            display, SWT.TITLE | SWT.RESIZE | SWT.MIN | SWT.MAX | SWT.CLOSE)
        shell.setSize(640, 480)
        shell.setText("Sample Application")
        shell.setLayout(new GridLayout())
        // Application Icon
        shell.setImage(new Image(display, this.getClass().getResourceAsStream(
            "/images/icon/calculator.32x32.png")))

        // Toolbar
        def toolbar = new ToolBar(shell, SWT.FLAT | SWT.RIGHT)
        // Open
        open = new ToolItem(toolbar, SWT.PUSH)
        open.setText('Open')
        open.setImage(new Image(display, this.getClass().getResourceAsStream(
            "/images/icon/start.32x32.png")))
        // Toolbar Size
        toolbar.pack()

        // List Table
        list = new Table(shell, SWT.FULL_SELECTION | SWT.BORDER)
        list.setHeaderVisible(true)
        list.setLayoutData(new GridData(GridData.FILL_BOTH))
        list.setFocus()

        // Event Listener
        open.addSelectionListener([
            widgetSelected : {  e ->
                def f = new FileDialog(shell, SWT.OPEN)
                f.setFilterPath(setting.defaultPath);
                f.setFilterExtensions(["*.csv"] as String[])
                def login = f.open()
                def message = convert.input(login);
                def box = new MessageBox(shell, SWT.OK | SWT.OK)
                box.setMessage(message)
                box.open()
            }
        ] as SelectionListener)

        shell.open()
    }

    public void loop() {
        while(!shell.isDisposed()) {
            if(!display.readAndDispatch()) {
                display.sleep();
            }
        }
        display.dispose()
    }

    def start() {
        try {
            init()
            loop()
        } catch(Exception e) {
            e.printStackTrace()
            def box = new MessageBox(shell, SWT.OK | SWT.ABORT)
            box.setMessage("例外が発生しました。\n" + e.message)
            box.open()
        }
    }
}
SWT の GUI 作成とメインイベントループがあります。
ソース先頭で、サービスクラスにあたる service.Convert と先ほど Application.yml を読むためにつくった ApplicationSetting を DI しています。
    @Autowired
    Convert convert

    @Autowired
    ApplicationSetting setting
ボタンを押したときのイベントでこれらを利用しています。
        // Event Listener
        open.addSelectionListener([
            widgetSelected : {  e ->
                def f = new FileDialog(shell, SWT.OPEN)
                f.setFilterPath(setting.defaultPath);
                f.setFilterExtensions(["*.csv"] as String[])
                def login = f.open()
                def message = convert.input(login);
                def box = new MessageBox(shell, SWT.OK | SWT.OK)
                box.setMessage(message)
                box.open()
            }
        ] as SelectionListener)
サービスクラスはとりあえず。
src/main/groovy/service/Convert.groovy
package sample.service;

import java.io.File;

import org.springframework.stereotype.Component;

@Component
public class Convert {
    def input(file) {
        return "converted!"
    }
}
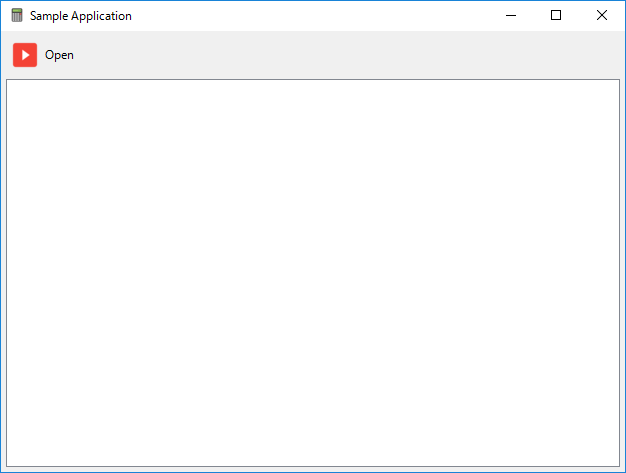
というわけで、Application.groovy を IDE から実行するか、./gradlew bootRun するとアプリケーションが起動します。
  .   ____          _            __ _ _
 /\\ / ___'_ __ _ _(_)_ __  __ _ \ \ \ \
( ( )\___ | '_ | '_| | '_ \/ _` | \ \ \ \
 \\/  ___)| |_)| | | | | || (_| |  ) ) ) )
  '  |____| .__|_| |_|_| |_\__, | / / / /
 =========|_|==============|___/=/_/_/_/
 :: Spring Boot ::        (v1.3.0.RELEASE)

2015-12-09 00:25:31.353  INFO 6560 --- [           main] sample.Application
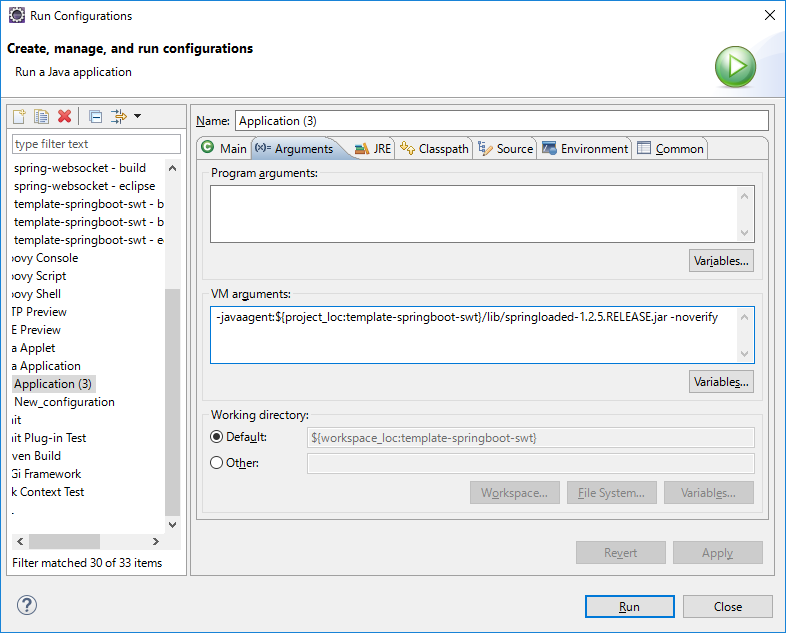
さて、ここで大技です。 spring-loaded を実行時に javaagent で読み込むことで、実行中に修正したクラスをリロードできるようになります。 プロジェクトサイトから jar をダウンロードし、アプリケーション実行時の JVM 引数に以下を加えます。
-javaagent:${project_loc:template-springboot-swt}/lib/springloaded-1.2.5.RELEASE.jar -noverify
“${project_loc:template-springboot-swt}” は Eclipse 的なプロジェクトホームの指定ですので、適宜変更してください。
なお、Eclipse で実行する場合は Application.groovy から Run してください。./gradle bootRun だとリロードされません。これは、Eclipse の場合、自動コンパイルの .class ファイルを置く先が bin/ ディレクトリ配下となり、bootRun した場合は build/ 配下の class ファイルで実行され、ファイルの更新がされないためです。
というわけで、spring-loaded ですが、やってみると異常に快適です。 GUI をつくる場合、対象の処理にたどり着くまでの操作が長くかかることがありますが、spring-loaded を入れておくとリトライが簡単で、なんだか世界が変わります。 🙂
その他、Spring Boot 上であると、H2 の組み込み DB や、JPA や GORM などの O/R マッパーも、gradle の定義だけでオートコンフィグレーションされてすぐ使えるようになりますので、非常に便利です。
今回のサンプルでは、サービスクラスで CSV を H2 に読んで GORM で抽出をかけたかったのですが、出張先にて機材トラブルにより間に合いませんでした。ごめんなさい。。
以上、あまり手間をかけず、ゆるいフレームワーク規約で自由気ままにツールなどの GUI をつくりたいなんて時に、良ければお試しください。
最後に、Apache Groovy おめでとうございます! 今年も Groovy にずいぶん助けてもらいました。 🙂
Keep on Groovy-ing!
Do you have any idea about how to combine Spring Boot + Eclipse RCP ?