Windows WSL2 の 1.0 版以降のカーネルでは、usbipd を経由することで Windows 側の USB 機器を IP 経由で参照することができます。
この動きを利用して、USB に接続した マイコン(M5Stack/USB-UART等々) に WSL2 Ubuntu 上のツールチェインから書き込みする手順を記載してみます。数コマンド叩くだけでセットアップは完了します。便利。
書き込み処理(libusb) は Linux 側で動作しますので、Windows 側にUSB-UART ドライバーなどのセットアップは不要です。
本記事では WSL2 を使った書き込み実用例として以下の手順を記載しています。
- esp-idf の
idf.pyコマンドを使った M5Stack Core2 への書き込み - PlatformIO を使った書き込み例
- openocd を使った M5Stamp C3 のデバッグ構成
- LicheePi 4A への fastboot コマンドを使ったファームウェア書き込み
環境
Windows WSL2 (Windows 10 の場合 1.0 以降)
> wsl --version
WSL バージョン: 1.0.3.0
カーネル バージョン: 5.15.79.1
WSLg バージョン: 1.0.47
MSRDC バージョン: 1.2.3575
Direct3D バージョン: 1.606.4
DXCore バージョン: 10.0.25131.1002-220531-1700.rs-onecore-base2-hyp
Windowsバージョン: 10.0.22621.1105
WSL2 Ubuntu 22.04
$ uname -a
Linux minis-um690 5.15.79.1-microsoft-standard-WSL2 #1 SMP Wed Nov 23 01:01:46 UTC 2022 x86_64 x86_64 x86_64 GNU/Linux
Windows に usbipd-win を導入
基本的に以下の Microsoft のガイドに従うと OK ですが、一部コマンドがカーネルバージョンに依存しているので、usbipd-win の手順も参照しています。
このガイドでは、USB/IP オープンソース プロジェクト usbipd-win を使用して、WSL 2 で実行されている Linux ディストリビューションに USB デバイスを接続するために必要な手順について説明します。
まずは Windows 側に usbipd-win を導入します。 PowerShell 窓より以下のコマンドにて。
> winget install --interactive --exact dorssel.usbipd-win
UPDATE – 2023-12 usbipd 4.0 リリースに伴い以下の Ubuntu 側へのクライアントツールのインストールは不要になりました。
次に WSL2 Ubuntu 22.04 に apt で usbipd を導入します。
$ sudo apt update
$ sudo apt upgrade
$ sudo apt install linux-tools-virtual hwdata
usbipd を登録。
$ sudo update-alternatives --install /usr/local/bin/usbip usbip `ls /usr/lib/linux-tools/*/usbip | tail -n1` 20
さて、この流れでついでに Ubuntu の udev を構成して、マイコンの USB 接続をユーザ権限から見れるようにしておきます。 PlatformIO の udev 定義を使うとほとんどのマイコンで使えて便利です。
$ curl -fsSL https://raw.githubusercontent.com/platformio/platformio-core/develop/platformio/assets/system/99-platformio-udev.rules | sudo tee /etc/udev/rules.d/99-platformio-udev.rules
これで WSL2 側から接続された USB を認識させる準備は完了です。手順上、いったん状態をクリアするため Windows ごと再起動します。
USB 機器のバインド
Windows 起動後、先に Ubuntu の usbipd を起動するために、WSL2 Ubuntu 窓を上げておきます。
また、WSL2 では udev サービスが自動起動しませんので、WSL2 起動後に以下のコマンドで起動します。(wsl.conf などで自動起動設定するのもいいかもしれません)
$ sudo service udev restart
次に Windows の PowerShell 窓を「管理者で起動」し、使いたい USB 機器を usbipdにアタッチします。
usbipd wsl list コマンドで USB 機器を表示。
4.0 系:
> usbipd list
3 系:
> usbipd wsl list
BUSID  VID:PID    DEVICE                                                        STATE
3-1    17ef:6047  Lenovo USB Interface Device(HID), USB 入力デバイス            Not attached
3-3    0e8d:0608  RZ608 Bluetooth(R) Adapter                                    Not attached
7-1    0499:170d  AG06/AG03, Line (AG06/AG03)                                   Not attached
9-1    10c4:ea60  CP2104 USB to UART Bridge Controller                          Not attached
ここでは、CP2104 USB to UART が M5Stack なので 9-1 をアタッチ。なお、初回のアタッチの操作のみ管理者権限が必要で次回からはユーザ権限でいけるようです。
4.0 系:
> usbipd attach --wsl --busid 9-1
3 系:
> usbipd wsl attach --busid 9-1
3 系:
この操作で以下のエラーが出力された場合は、再度 Ubuntu 側で sudo update-alternatives --install を実行してください。(Ubuntu カーネル(tools の)バージョンが上がった場合に発生します)
❯ usbipd.exe wsl attach --busid 9-3
usbipd: error: WSL 'usbip' client not correctly installed. See https://github.com/dorssel/usbipd-win/wiki/WSL-support for the latest instructions.
linux-tools がアップデートされた例(ここでは Kernel 5.15.0-70 から 5.15.0.-71)された後の update-alternatives 設定ログ:
$ sudo update-alternatives --install /usr/local/bin/usbip usbip `ls /usr/lib/linux-tools/*/usbip | tail -n1` 20
update-alternatives: 警告: /usr/lib/linux-tools/5.15.0-70-generic/usbip の alternative (リンクグループ usbip のパート) が存在しません 。alternatives のリストから削除しています
update-alternatives: 警告: /etc/alternatives/usbip is dangling; it will be updated with best choice
update-alternatives: /usr/local/bin/usbip (usbip) を提供するために自動モードで /usr/lib/linux-tools/5.15.0-71-generic/usbip を使います
ちなみにユーザ権限がついたあとは、Ubuntu 側 WSL2 窓から次のコマンドでも操作可能です。(.exe を付けて明示的に Windows 側のコマンドを呼びます)
4.0 系:
$ usbipd.exe attach --wsl --busid 9-1
3 系:
$ usbipd.exe wsl attach --busid 9-1
うまくいけば、upsipd wsl list コマンドのデバイス部分が Ubuntu になります。
4.0 系:
> usbipd list
3 系:
> usbipd wsl list
BUSID  VID:PID    DEVICE                                                        STATE
9-1    10c4:ea60  CP2104 USB to UART Bridge Controller                          Attached - Ubuntu-22.04
できたら、WSL2 Ubuntu で lsusb してみて機器(CP210)が見えればOKです。
$ lsusb
Bus 002 Device 001: ID 1d6b:0003 Linux Foundation 3.0 root hub
Bus 001 Device 004: ID 10c4:ea60 Silicon Labs CP210x UART Bridge
Bus 001 Device 001: ID 1d6b:0002 Linux Foundation 2.0 root hub
PlatformIO からお借りした udev 定義が効いていれば、USB-UART では /dev/ttyUSB0 あたりにユーザ権限の書き込み付きでブロックデバイスが見えます。rw-rw-rw なら成功です。
$ ls -laF /dev/ttyUSB*
crw-rw-rw- 1 root dialout 188, 0  1月 28 17:17 /dev/ttyUSB0
マイコンが暴走して USB を抜き差しした後などで、usbipd.exe で再アタッチするも udev が効かないケースがあるようです。その場合は面倒なので手動で chmod するのもありかと思います。
$ sudo chmod 666 /dev/ttyUSB0
esp-idf の idf.py コマンドを使った M5Stack Core2 への書き込み
Ubuntu 22.04 上に esp-idf を構成して idf.py コマンドで書き込む例です。なお、esp-idf ツールチェインが必要とする Ubuntu の依存関係はこちらに記載されています。
$ get_idf
$ echo ${IDF_PATH}
/home/hiromasa/devel/toolchain/esp-idf
$ idf.py --version
ESP-IDF v4.4.3
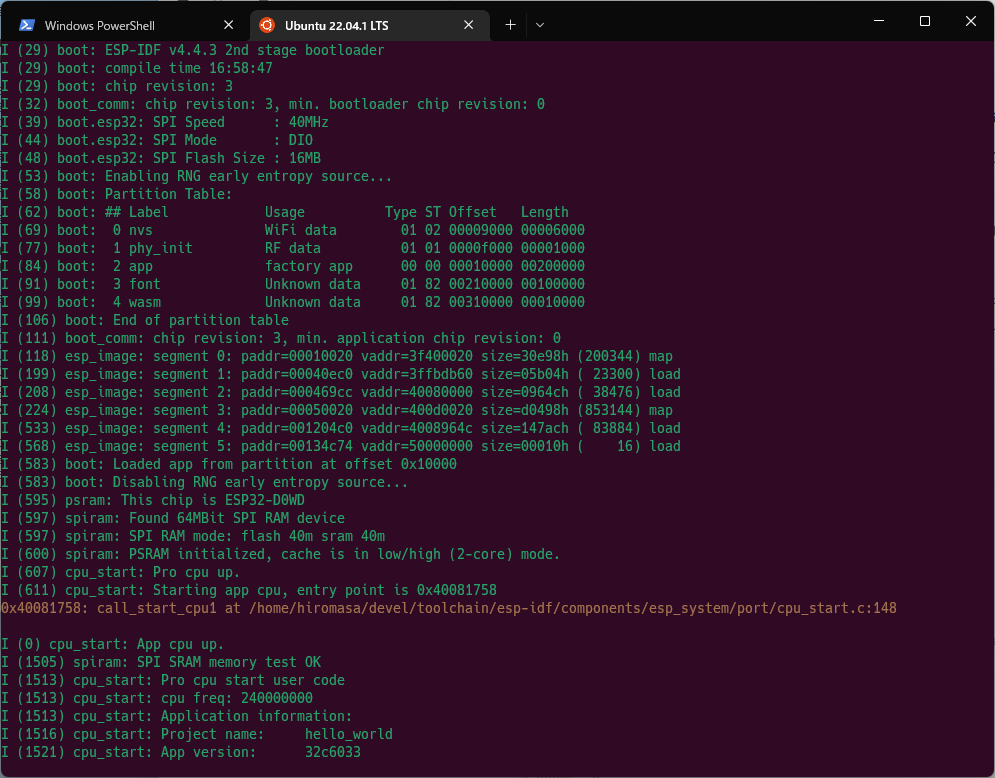
esp-idf (esp-tools) は自動的にシリアルポートを探してくれますので、以下のいつもの idf.py flash monitor コマンドで書き込みからログ入力まで動作します。
$ idf.py build flash monitor
Executing action: all (aliases: build)
Running ninja in directory /home/hiromasa/devel/esp32/m5stack-core2-wasm3-as/build
Executing "ninja all"...
[1/4] cd /home/hiromasa/devel/esp32/m5stack-core2-wasm3-as/b...asa/devel/esp32/m5stack-core2-wasm3-as/build/hello_world.bin
hello_world.bin binary size 0x124cb0 bytes. Smallest app partition is 0x200000 bytes. 0xdb350 bytes (43%) free.
[2/4] Performing build step for 'bootloader'
[1/1] cd /home/hiromasa/devel/esp32/m5stack-core2-wasm3-as/build/bootloader/esp-idf/esptool_py && /home/hiromasa/.espressif/python_env/idf4.4_py3.10_env/bin/python /home/hiromasa/devel/toolchain/esp-idf/components/partition_table/check_sizes.py --offset 0x8000 bootloader 0x1000 /home/hiromasa/devel/esp32/m5stack-core2-wasm3-as/build/bootloader/bootloader.bin
Bootloader binary size 0x6330 bytes. 0xcd0 bytes (11%) free.
Executing action: flash
Serial port /dev/ttyUSB0
Connecting....
Detecting chip type... Unsupported detection protocol, switching and trying again...
Connecting.....
Detecting chip type... ESP32
...以下略...
本環境設定と合わせて、プロジェクトディレクトリを VSCode の WSL Remote 拡張で開けば、ソースコードの編集からマイコンへの書き込みまで Linux 周りのツールで揃えることができるので便利なのではないかと思います。
WSL2 からのマイコンへの書き込みの操作は以上です。usbipd 経由で接続された USB が WSL2 側から認識できれば、他は特殊な操作は不要で書き込みすることができます。
VS Code の WSL Remote 拡張は、先に Windows 側の VS Code で拡張を導入した上で一度終了。 WSL2 側のターミナルでプロジェクトディレクトリにカレントディレクトリを cd で移し、
$ code .
とすると、外見は Windows で中身は Linux の VS Code が起動します。初回起動、及びアップデートがあった場合のみ、Linux 版の VS Code backend (vscode-server) をダウンロードするため少しだけ時間がかかります。
起動したら、その他で Linux 側に必要な拡張がある場合(PlatformIO 等)は、拡張を入れる画面から「WSL2 に入れる」的なボタンを押してあげてください。
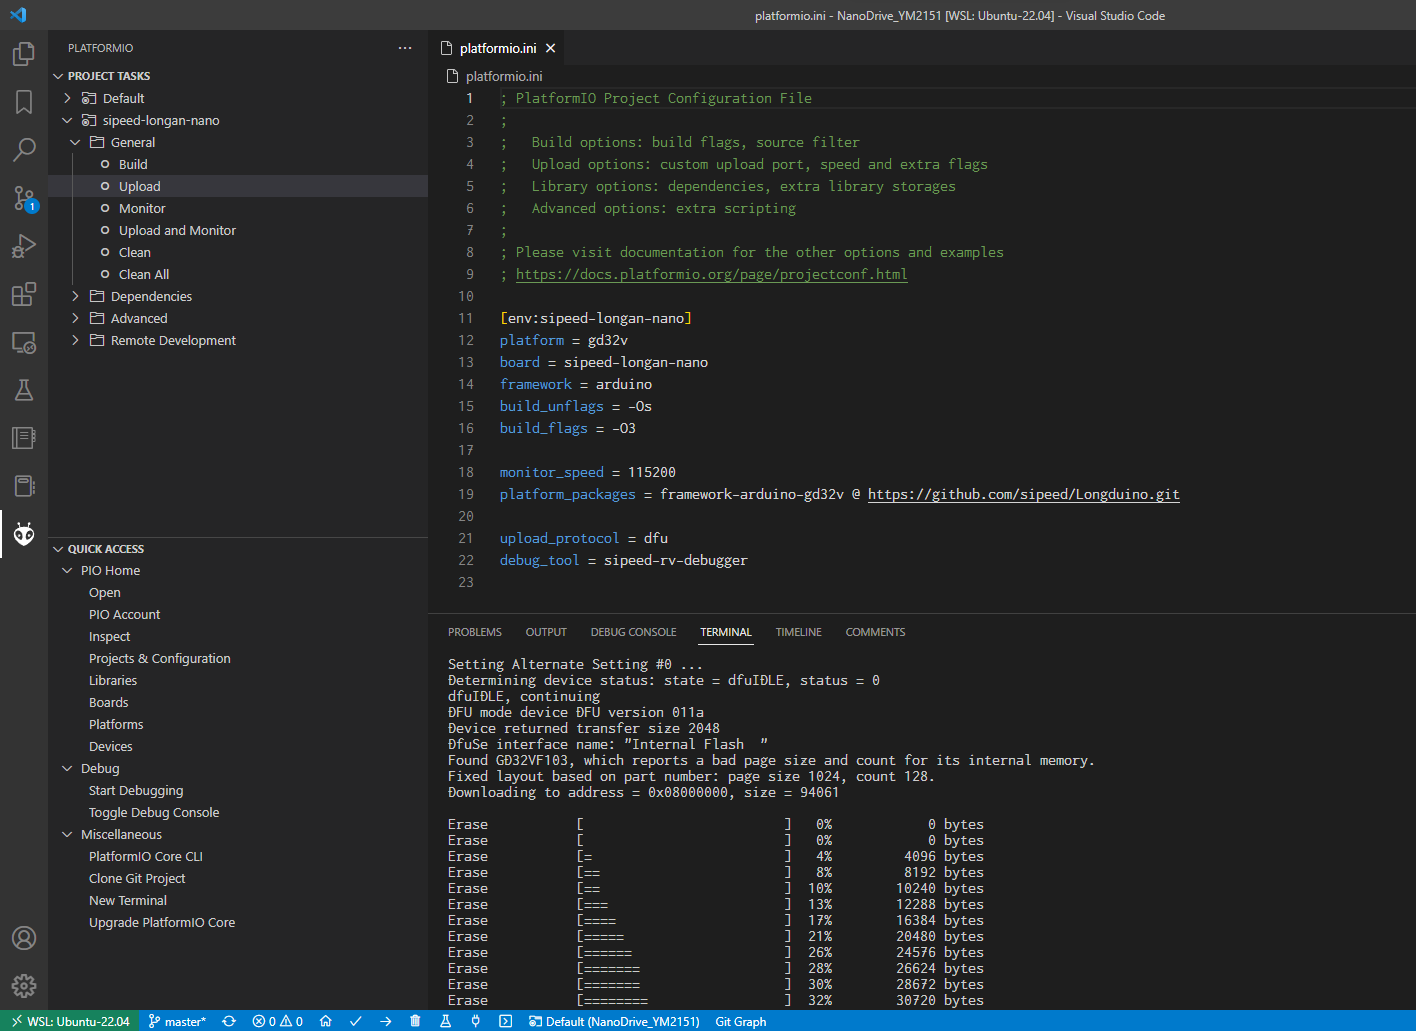
PlatformIO を使った書き込み例
Longan Nano (GD32V) + VSCode + PlatformIO の例です。
Longan Nano dfu 用の udev 構成:
$ cat /etc/udev/rules.d/70-ttyusb.rules #ファイル追加
# Longan Nano
SUBSYSTEM=="usb", ATTRS{idVendor}=="28e9", ATTRS{idProduct}=="0189", MODE="0666"
SUBSYSTEM=="usb_device", ATTRS{idVendor}=="28e9", ATTRS{idProduct}=="0189", MODE="0666"
$ sudo service udev restart # udev restart
Longan Nano を BOOT + RESET 起動で dfu モードに入れて attach。
> usbipd wsl list
BUSID  VID:PID    DEVICE                                                        STATE
3-1    17ef:6047  Lenovo USB Interface Device(HID), USB 入力デバイス            Not attached
3-3    0e8d:0608  RZ608 Bluetooth(R) Adapter                                    Not attached
7-1    0499:170d  AG06/AG03, Line (AG06/AG03)                                   Not attached
9-1    28e9:0189                                                                Not attached
先に管理者権限 PowerShell でアタッチした後、リセットするとアタッチが切れるので、再アタッチ。 WSL2 Ubuntu 側からも Windows の usbipd.exe を呼べる動作を活用してアップロード操作前にアタッチコマンドを実行できるようにタスクを組むと便利。
$ usbipd.exe wsl attach --busid 9-1
$ lsusb
Bus 002 Device 001: ID 1d6b:0003 Linux Foundation 3.0 root hub
Bus 001 Device 004: ID 28e9:0189 GDMicroelectronics GD32 DFU Bootloader (Longan Nano)
Bus 001 Device 001: ID 1d6b:0002 Linux Foundation 2.0 root hub
あとは WSL2 側に入れた VSCode と PlatformIO 拡張から、いつも通り Upload を起動すれば書き込みできます。
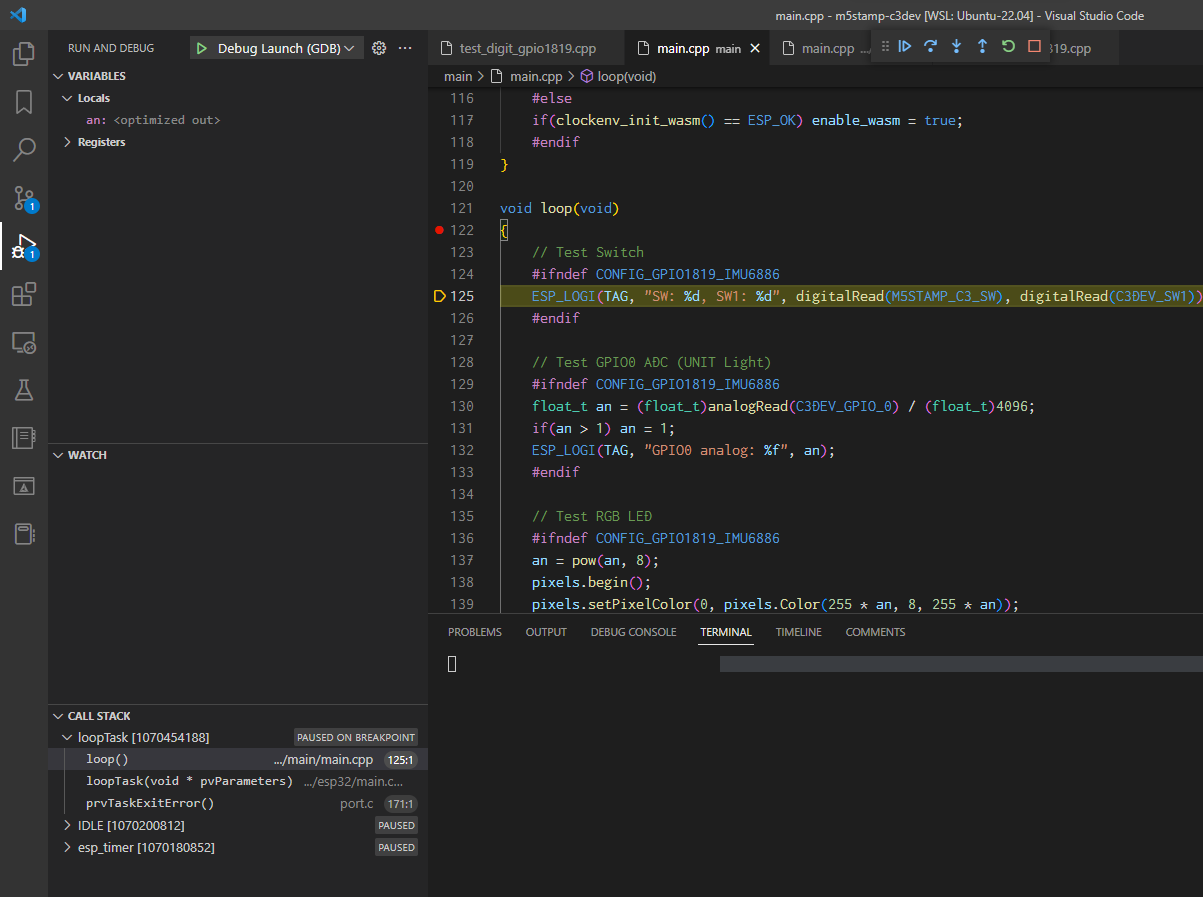
openocd デバッグを行う場合
M5Stamp C3 の USB JTAG デバッグを行う設定例です。
M5Stamp C3 は 「M5Stamp C3 用の開発向けボードを製作」のように USB JTAG を引き出すことができます。また、M5Stamp C3U では付属の USB ポートでいけると思います。
openocd の依存となる libusb の導入(esp-idf の依存で導入されているかもですが念の為。どちらかでだけでもいいかものと、-dev を入れているのは癖なので外しても OK です)
$ sudo apt install libusb-dev libusb-1.0-0-dev
openocd の依存となる libpython2.7 導入
$ sudo apt install libpython2.7
USB ポートに M5Stamp C3 の JTAG USB 側(?) を引き出して接続、Windows 側でアタッチ後 Linux で USB 認識確認
$ lsusb | grep JTAG
Bus 001 Device 007: ID 303a:1001 Espressif USB JTAG/serial debug unit
udev 構成追加( 303a の 追加)
$ cat /etc/udev/rules.d/99-platformio-udev.rules | grep 303a
# 以下を追加
ATTRS{idVendor}=="303a", ATTRS{idProduct}=="1001", MODE="0666", ENV{ID_MM_DEVICE_IGNORE}="1", ENV{ID_MM_PORT_IGNORE}="1"
udev restart
$ sudo service udev restart
接続確認
いったん USB を抜き差しして、Windows 側で再アタッチなどして、接続確認します。
$ ls -laF /dev/ttyACM*
crw-rw-rw- 1 root dialout 166, 0  1月 28 19:46 /dev/ttyACM0
openocd 起動
$ which openocd
/home/hiromasa/.espressif/tools/openocd-esp32/v0.11.0-esp32-20221026/openocd-esp32/bin/openocd
$ openocd -f board/esp32c3-builtin.cfg
Open On-Chip Debugger  v0.11.0-esp32-20220706 (2022-07-06-15:48)
Licensed under GNU GPL v2
For bug reports, read
        http://openocd.org/doc/doxygen/bugs.html
Info : only one transport option; autoselect 'jtag'
Info : esp_usb_jtag: VID set to 0x303a and PID to 0x1001
Info : esp_usb_jtag: capabilities descriptor set to 0x2000
Warn : Transport "jtag" was already selected
Info : Listening on port 6666 for tcl connections
Info : Listening on port 4444 for telnet connections
Info : esp_usb_jtag: serial (34:B4:72:12:94:14)
Info : esp_usb_jtag: Device found. Base speed 40000KHz, div range 1 to 255
Info : clock speed 40000 kHz
Info : JTAG tap: esp32c3.cpu tap/device found: 0x00005c25 (mfg: 0x612 (Espressif Systems), part: 0x0005, ver: 0x0)
Info : datacount=2 progbufsize=16
Info : Examined RISC-V core; found 1 harts
Info :  hart 0: XLEN=32, misa=0x40101104
Info : starting gdb server for esp32c3 on 3333
Info : Listening on port 3333 for gdb connections
VSCode などから接続(設定例)
おそらく openocd 接続後初回の Debug Launch は(マイコンの状態により)失敗するので、2回 Debug Launch するとブレイクすると思います。(WSL2 ではない Ubuntu でも再現するので自分の setupCommandsが悪いのかもしれません)
Lichee Pi 4A の fastboot による Flash
Lichee Pi 4A の boot ボタンを押しながら PC の USB-C に接続。
> usbipd.exe wsl list
BUSID  VID:PID    DEVICE                                                        STATE
6-1    2345:7654  USB download gadget
初回の場合は PowerShell 管理者で実行。
> usbipd.exe wsl attach --busid 6-1
WSL2 側で認識確認。
$ sudo dmesg
[   31.713030] usb 1-1: new high-speed USB device number 2 using vhci_hcd
[   31.873057] usb 1-1: SetAddress Request (2) to port 0
[   31.920340] usb 1-1: New USB device found, idVendor=2345, idProduct=7654, bcdDevice= 2.23
[   31.921254] usb 1-1: New USB device strings: Mfr=1, Product=2, SerialNumber=0
[   31.921580] usb 1-1: Product: USB download gadget
[   31.921790] usb 1-1: Manufacturer: T-HEAD
[   49.129386] hv_balloon: Max. dynamic memory size: 14204 MB
あとは fastboot コマンドで書き込めば OK です。
$ pwd
/home/hiromasa/devel/riscv/lip4a/images/0511_gnome
$ ls -laF
合計 4259020
drwxrwxr-x 2 hiromasa hiromasa       4096  5月 12 12:04 ./
drwxr-xr-x 3 hiromasa hiromasa       4096  6月  2 17:24 ../
-rw-rw-r-- 1 hiromasa hiromasa   62914560  5月 12 11:35 boot-20230510-230240.ext4
-rwxrwxrwx 1 hiromasa hiromasa        368  5月 12 11:29 burn_gnome_gpu.sh*
-rwxrwxrwx 1 hiromasa hiromasa    2230360  5月  5 23:47 fastboot*
-rw-rw-r-- 1 hiromasa hiromasa       2022  5月 12 11:38 image_intro.txt
-rw-r--r-- 1 hiromasa hiromasa      68443  5月 12 11:36 light-lpi4a_1.85GHz.dtb
-rw-r--r-- 1 hiromasa hiromasa      68464  5月 12 11:36 light-lpi4a_2Ghz.dtb
-rw-rw-r-- 1 hiromasa hiromasa        259  5月 12 11:21 md5sum.txt
-rw-rw-r-- 1 hiromasa hiromasa 4294967296  5月 12 11:32 rootfs-20230511-183752-gnome.ext4
-rw-rw-r-- 1 hiromasa hiromasa     957728  5月 12 11:21 u-boot-with-spl-lpi4a-20230510.bin
$ file fastboot
fastboot: ELF 64-bit LSB pie executable, x86-64, version 1 (SYSV), dynamically linked, interpreter /lib64/ld-linux-x86-64.so.2, for GNU/Linux 2.6.24, not stripped
なのですが、一度 uboot を書く前のファームウェア書き込み後に一度リセットがかかり <waiting device..> となりますので、ここのタイミングで再度 PowerShell 側で usbipd.exe wsl attach --busid 6-1 すれば完走できます。
$ ./burn_gnome_gpu.sh
Sending 'ram' (935 KB)                             OKAY [  0.248s]
Writing 'ram'                                      OKAY [  0.002s]
Finished. Total time: 0.256s
Rebooting                                          OKAY [  0.001s]
Finished. Total time: 0.202s
< waiting for any device > # ←ここで再度 wsl attach する
Sending 'uboot' (935 KB)                           OKAY [  0.058s]
Writing 'uboot'                                    OKAY [  0.031s]
Finished. Total time: 0.113s
Sending 'boot' (61440 KB)                          OKAY [  2.568s]
Writing 'boot'                                     OKAY [  1.535s]
Finished. Total time: 4.241s
Invalid sparse file format at header magic
Sending sparse 'root' 1/33 (113316 KB)             OKAY [  4.680s]
Writing 'root'                                     OKAY [  2.791s]
Sending sparse 'root' 2/33 (110992 KB)             OKAY [  4.660s]
Writing 'root'                                     OKAY [  2.568s]
...(snip)...
Writing 'root'                                     OKAY [  2.891s]
Sending sparse 'root' 32/33 (114684 KB)            OKAY [  4.709s]
Writing 'root'                                     OKAY [  2.617s]
Sending sparse 'root' 33/33 (9492 KB)              OKAY [  0.417s]
Writing 'root'                                     OKAY [  0.236s]
Finished. Total time: 264.331s