Sixel グラフィックスは、キャラクターベースのターミナルエミュレータを拡張し、特別なエスケープシーケンスを送信することでビットマップグラフィックを表示する技術です。
この記事は、2023-06 に VS Code 内蔵ターミナルエミュレータが Sixel グラフィックスを実験的にサポートしたので試してみたのと、他の自分が使っているターミナルについても対応状況を調べてみたメモです。
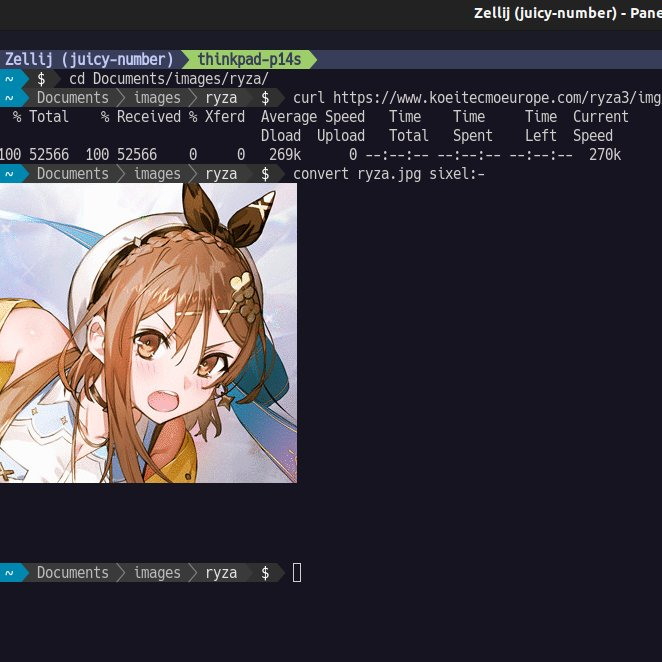
Sixel グラフィックスに対応したターミナルは、curl した画像やジェネレータコマンドで生成した画像をそのままの流れで確認できたりするので便利です。
VS Code
VS Code 設定:(expertimertal から stable に昇格した時は設定不要になるはずです。2023-07 リリースの 1.80 で昇格したので以下の設定は不要になりました)
{ "terminal.integrated.experimentalImageSupport": true }
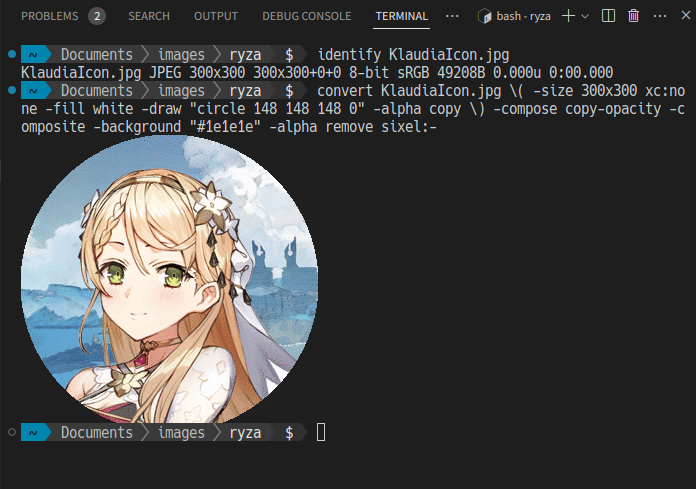
ImageMagick の convert コマンドで出力を sixel:- とすると標準出力に sixel 形式が出力されターミナルにグラフィックが表示されます。
convert コマンドを試行錯誤している中で、画像出力がすぐに動作確認できて便利の図。(良さそうになったらファイル出力する)
# 画像サイズ取得
$ identify KlaudiaIcon.jpg
KlaudiaIcon.jpg JPEG 300x300 300x300+0+0 8-bit sRGB 49208B 0.000u 0:00.000
# 丸抜きマスク画像生成
$ convert -size 300x300 xc:black -fill white -draw "circle 148 148 148 0" -alpha copy mask-300px.png
# マスクと画像でアルファ合成
$ convert KlaudiaIcon.jpg mask-300px.png -compose copy-opacity -composite sixel:-
# ワンライナー and 透過色の出力色指定
$ convert KlaudiaIcon.jpg \( -size 300x300 xc:none -fill white -draw "circle 148 148 148 0" -alpha copy \) -compose copy-opacity -composite -background "#1e1e1e" -alpha remove sixel:-
# 普通に透過色
convert pidgin-ryza.png \( -size 162x162 xc:none -fill white -draw "circle 80 80 80 0" -alpha copy \) -compose copy-opacity -composite pidgi
n-ryza-circle.png
# SVG を大きさ指定で入力
$ convert -size 1000x1000 input.svg sixel:-
なお .svg 表示などのレンダリングで使われる、convert コマンドから見えるフォント名は以下のようにすると得ることができます。
$ convert -list font | grep -e Font | egrep 'JP$'
  Font: Noto-Sans-CJK-JP
  Font: Noto-Sans-Mono-CJK-JP
  Font: Noto-Serif-CJK-JP
# フォントがある .svg を出力する例
$ convert -font 'Noto-Sans-CJK-JP' math-sample1.svg sixel:-
# 任意サイズのダミー画像をつくる例
$ convert -size 320x200 -background "#95a5a6" -fill "#2c3e50" -font 'Noto-Sans-CJK-JP' -pointsize 36 -gravity center label:"320x200" sixel:-
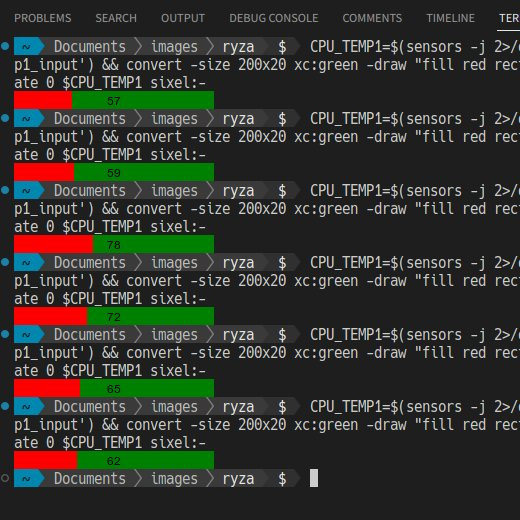
sensors コマンドで CPU の温度を表示してそれっぽく表示するメモ。
$ CPU_TEMP1=$(sensors -j 2>/dev/null \
    | jq '.["thinkpad-isa-0000"]["CPU"].temp1_input') \
    && convert -size 200x20 \
    xc:green \
    -draw "fill red rectangle 0,0,${CPU_TEMP1},20" \
    -gravity center \
    -annotate 0 ${CPU_TEMP1} \
    sixel:-
Alacritty
Alaclitty は2023-06 現在まだ Sexel に対応していませんが、マスターブランチにマージ可能なプルリクが存在します。
Support for graphics in the terminal #4763
This patch adds support for graphics in the terminal. Graphics can be sent as Sixel images.
以下、対応ソースが入っているブランチをビルドして Alacritty + Zellij(Sixel 対応済み) で動作させてみた様子です。(Zellij を通すと clearコマンドなどが正常に機能しないパターンがあるかも。継続確認。Alacritty のみだと綺麗に動作しています)
$ montage *.jpg -tile 4x3 -geometry 240x240 sixel:-

ちなみに ffmpeg-sixel もうまく動作しました。(VS Code のターミナルだと動画の表示位置が左上固定になってしまいますが、Alacritty はカーソル位置の下で再生できました)
https://github.com/Albert-S-Briscoe/FFmpeg-SIXEL
FFmpeg fork for outputting full resolution video to your terminal
$ ffmpeg -i test.mp4 -f sixel -pix_fmt rgb24 -s 800x450 - -f alsa -ac 2 pulse -loglevel quiet
Windows Terminal
Windows Terminal はサポートリクエストがあがっています。ソースコードを grep すると sixel という文字列がいくつか見えるので対応するのかな?(未確認)
Feature Request: sixel graphics support #448
Would like to see Sixel support in the Terminal, this is the standard used to show graphics in the console.
継続ウォッチしていきます。
記事中の画像はライザのアトリエ3 “Social Icons and Wallpapers” で配布されているものを使わせていただきました。(先日、ライザ1-3 まで通しでクリアしてすごく良かった…!)
https://www.koeitecmoeurope.com/ryza3/social.html
To celebrate the release of “Atelier Ryza 3: Alchemist of the End & the Secret Key” , we have prepared some social icons and phone wallpapers for you to enjoy!